Have you ever noticed that small image appearing on the browser tab when you open a website? It might look like just a decorative touch, but that little icon, called a favicon, is more important than you think.
It’s like a signature for your website, a tiny but powerful way to establish your brand. A favicon is your chance to add a touch of identity and professionalism to your site.
In this guide, we’ll cover what is a favicon, why it’s crucial for your website, and the steps to create and integrate one seamlessly.
What Is a Favicon?
A favicon is a small icon that acts as a visual representation of your website. Its name comes from the term “favorite icon,” coined during the early days of the internet when browsers used these images to mark favorite websites.
The primary purpose of a favicon is to help users quickly identify your website, even among dozens of open tabs or saved bookmarks.
Importance of Favicons in Website Design
You might wonder, “Does this tiny image really matter that much?” The answer is a resounding yes!
- A favicon can make your website more visually appealing,
- easier to navigate, and more professional-looking.
- a favicon enhances your website’s usability.
Without a favicon, your site would blend in with others, making it hard to find. With a favicon, however, your site stands out, allowing users to spot it instantly.
Favicon’s Role in Branding
A favicon also contributes to branding. It acts as a mini logo that consistently reminds users of your site’s identity. Over time, this tiny icon becomes associated with your website in your visitors’ minds, just like a well-designed logo does for a business.
“A favicon might seem small, but its impact on branding is anything but,” says branding expert John Carter. “It’s a chance to reinforce your brand’s identity every time someone opens their browser.”
Steps to Make and Design a Favicon
Creating your favicon doesn’t require expensive tools or advanced design skills. Start by selecting an image or design element that reflects your brand. This could be your logo, a symbol, or even an initial. Here’s a step-by-step guide to designing a favicon:
- Start with a canvas: Open a graphic design tool and create a canvas with dimensions of 16×16 or 32×32 pixels. These are the standard sizes for favicons.
- Add your design: Import your logo or create a new design. Keep it simple, focusing on bold shapes or letters.
- Optimize for clarity: Zoom out to preview how your favicon looks at small sizes. Make adjustments as needed to ensure it remains clear and recognizable.
- Export in the right format: Save your design as a PNG file or ICO file to ensure compatibility with most browsers.
This method ensures your favicon is tailored to your website’s needs and ready for seamless integration.
Using a Free Favicon Generator
If you’re not confident in your design skills, don’t worry! You can use an online favicon generator to create your favicon effortlessly. These tools allow you to upload an image, customize its appearance, and download a ready-to-use favicon in just a few clicks. Popular favicon generators include:
- Favicon.io: A beginner-friendly tool that lets you upload your logo and export it in multiple formats.
- RealFaviconGenerator.net: Offers advanced customization options and checks for browser compatibility.
- X-Icon Editor: A free tool that allows you to design and edit favicons directly online.
These tools save time and ensure your favicon meets modern browser requirements without the need for technical expertise.
How to Transform Your Logo into a Perfect Favicon
Turning your logo into a favicon involves a bit of creativity. Since logos are often more detailed than favicons, you’ll need to simplify the design to ensure it’s clear and effective at small sizes.
Focus on the most recognizable aspect of your logo. This could be a single letter, a symbol, or a simplified version of the full design. For example, Google uses a simple “G” for its favicon, while Nike uses its iconic swoosh. By reducing complexity, you can create a favicon that remains visually appealing across platforms. Icon vs. Favicon: Are They the Same?
Adding Favicons to Different Platforms
Once you’ve created your favicon, the next step is adding it to your website. The process varies depending on the platform you’re using, but don’t worry—it’s simpler than you might think.
Whether you’re using WordPress, Wix, Shopify, or coding a website manually, there’s a straightforward way to get your favicon up and running.
1. How to Add a Favicon to WordPress

Adding a favicon in WordPress is one of the easiest methods, thanks to its built-in customization features. Here’s how you can do it:
- Go to the Customizer: In your WordPress dashboard, navigate to Appearance > Customize.
- Locate Site Identity: Click on “Site Identity” and look for the “Site Icon” option.
- Upload Your Favicon: Upload your favicon image (in PNG or ICO format) and save the changes.
Once you’ve completed these steps, your favicon will automatically appear in the browser tab when someone visits your site. WordPress handles the technical details, so you don’t need to worry about coding or file placement.
2. How to Add a Favicon to Your Wix Website

For those using Wix, the process is equally straightforward. Wix provides a dedicated option for uploading favicons:
- Access the Site Manager: Log in to your Wix dashboard and go to your site’s settings.
- Upload Your Favicon: In the “Favicon” section, upload your favicon image. Make sure it meets Wix’s requirements for favicon size and format.
- Save and Publish: Save the changes and publish your site.
Your favicon will now appear in the browser tab whenever visitors open your Wix website. This small addition can make your site look polished and professional.
3. How to Add a Favicon Using HTML
If you’re building a custom website without a CMS, you can use HTML to add your favicon. The process is slightly more technical but still manageable.
- Place the Favicon File: Upload your favicon file to the root directory of your website.
- Add HTML Code: Insert the following code into the
<head>section of your HTML file:htmlCopy code<link rel="icon" href="favicon.ico" type="image/x-icon"> - Test Your Favicon: Open your website in a browser to ensure the favicon is displayed correctly in the browser tab.
This method gives you complete control over your favicon’s integration and is ideal for developers who prefer manual setups.
4. Integrating a Favicon for Your Shopify Website

For Shopify users, adding a favicon is simple and doesn’t require any coding. Follow these steps:
- Access Theme Settings: In your Shopify dashboard, navigate to Online Store > Themes > Customize.
- Upload Your Favicon: Under “Theme Settings,” look for the Favicon option and upload your favicon image.
- Save Changes: Click “Save,” and your favicon will be applied to your Shopify site.
Shopify ensures your favicon is optimized for compatibility, making this a hassle-free process for e-commerce websites.
Tips for Optimizing Your Favicon for SEO
A well-designed favicon isn’t just about looks—it can also contribute to your website’s SEO. Here are some practical tips to optimize your favicon for search engines:
- Keep It Lightweight: Ensure your favicon file is under 64KB to avoid slowing down your site’s loading speed.
- Use Compatible Formats: Stick to common favicon formats like PNG, ICO, or SVG to ensure it displays correctly in all browsers.
- Test Across Devices: Check how your favicon looks on both desktop and mobile browsers to ensure consistency.
- Align It with Your Branding: Use a design that reflects your brand’s identity, ensuring consistency across platforms.
How Favicons Matter for SEO
While favicons don’t directly influence your rankings, they play an important role in enhancing your website’s user experience, which indirectly affects SEO. A favicon can help make your site more recognizable, encouraging users to return and interact with your content.
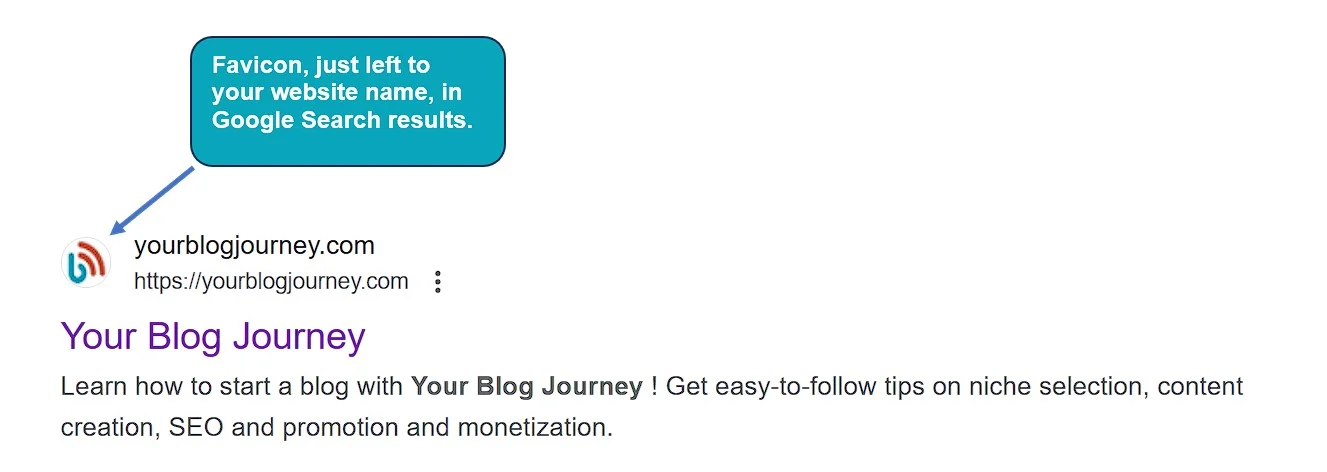
Additionally, search engines like Google display favicons in search results. This feature can make your website stand out, especially in competitive niches.
A unique, well-designed favicon acts as a visual cue that draws attention to your link, potentially boosting click-through rates.
File Format and Size Considerations for SEO
Choosing the right favicon format is critical for SEO and user experience. The most common formats are ICO and PNG format, both of which are supported by most browsers.
Additionally, keep your favicon size optimized—16×16 pixels is the standard, but many platforms support larger sizes, such as 32×32 or 48×48 pixels, for higher resolution displays. Ensuring your favicon is lightweight and scalable can improve your site’s loading speed and compatibility.
Favicons and Bookmarks: How They Improve Website Visibility
Favicons don’t just appear in the browser tab; they also show up next to bookmarks. This is a powerful way to enhance your website’s visibility.
Imagine a user bookmarking several pages—they’re more likely to revisit your site if your favicon is visually appealing and easy to recognize.
By adding a favicon, you’re making it easier for users to remember your site, boosting both traffic and engagement over time.
Favicon FAQ
Q1: Do I Need a Favicon?
Ans: Yes, every website needs a favicon! It makes your site look professional and helps with branding.
Q2: How to See the Favicon in Browsers?
Ans: You can find it in the browser tab, address bar, or bookmarks section.
Q3: What are Free Resources for Favicon Creation
Ans: Try tools like Favicon.io, Canva, or RealFaviconGenerator.net for easy favicon creation.
Final Thoughts
A favicon can make your website memorable, professional, and user-friendly. It’s a small detail, but its impact on branding, usability, and SEO is immense. Follow the steps in this guide to create and integrate a favicon that enhances your site’s functionality and leaves a lasting impression on your visitors.
It’s time to make your site stand out, one tiny icon at a time!
If you want to know what is crawling and how its understanding can improve your website SEO, then read this article – What is Crawling in SEO

