During our blogging journey, we all face the challenge of migrating WordPress websites from one host to another. The thought of migrating your WordPress site might feel overwhelming. Don’t worry, you’re not alone!
I recently moved my site from cloud hosting service to VPS hosting to improve its speed and get more control over it. I discovered a handy and free WordPress migration plugin, so I will share my recent migration experience with you all through this post.
Key Takeaways
- Learn how to migrate a website using a plugin.
- Understand the Important Pre-migration steps.
- Detailed Step-by-step process to migrate a website on your own with a WordPress Plugin.
- Know vital Post-migration steps and troubleshooting after completion of WordPress migration.
Why You Need to Migrate Your WordPress Site
Migrating your WordPress site can feel like moving to a new home. It’s exciting, but there’s still work to be done. Here’s why you might need to migrate website?
- Better Performance: If your site is slow, it could be time to switch to a faster WordPress hosting provider.
- More Storage: Growing websites often need more space, and some hosts offer better storage options.
- Cost Savings: A new hosting provider might give you better value for your money.
- Improved Support: Not all web hosts provide the support you deserve. Moving to one with excellent customer service can save you headaches.
Regardless of the reason, the goal is to ensure your website performs optimally on its new server.
Preparing for the WordPress Migration Process
Getting ready for a WordPress migration is like packing for a trip; you need to gather everything you’ll need to ensure a smooth journey. Skipping this step can lead to confusion and mistakes, so it’s important to prepare properly before you start. Here’s what you need to do:
1. Decide a Migration Date
The very first step is to decide a migration date. Avoid migration on during peak seasons or during high-traffic periods. It’s better to migrate on weekend, when traffic is lowest and providing you full weekend to fix issues before next working date. Although it varies based on different niches.
2. Backing Up Your Existing WordPress Database and Site
Imagine moving to a new house without securing your valuables. Risky, right? The same applies to your website. A backup of your WordPress website ensures that your content, themes, plugins, and settings are safe, regardless of what happens during the migration.
Use a trusted backup plugin, such as All-in-One WP Migration or Duplicator, to securely save all your files and database. Once your backup is ready, you can proceed to the next
3. Gather Details of a New Host
You’ll need login credentials for your new hosting control panel and FTP credentials. If you’re unsure, your hosting provider’s support team can guide you.
4. Exporting Your WordPress Site Files
Finally, decide whether you’ll use a migration plugin such as Migrate Guru or opt for the manual migration route. Plugins are quicker and easier, especially for beginners. Have everything ready, including your backup file and hosting details, before you begin.
For manual export:
- Access your old site’s files via FTP or the hosting control panel.
- Compress the files into a zip folder for easy transfer.
In this post, we are focussing on migration of your existing website through a migration plugin instead of manual migration.
The manual WordPress migration process is a bit complex and cumbersome and there are chances of going things wrong. So, it’s better to use a plugin or take help from your new host.
Here is a quick summary of Pre-WordPress Migration Steps
WordPress Site Pre Migration Steps
- Decide a suitable migration date
- Take Backup of your Website and Database
- Gather login Credentials of your new hosting
- Select a WordPress Migration Plugin
Best WordPress Migration Plugins
When it comes to migrating a WordPress site, plugins are your best friend. The right plugin can save you time, effort, and potential mistakes. Here’s a list of the best plugins for WordPress site migration:
| Plugin | Features | Pricing |
|---|---|---|
| Migrate Guru | Free, handles large sites, no downtime | Free |
| All-in-One WP Migration | Easy interface, supports backups | Free / Premium |
| Duplicator | Full backup and migration tool | Free / Premium |
Migrate Guru: A Free Comprehensive Solution
If you want to migrate your site hassle-free, Migrate Guru is the best choice. This free plugin is known for its simplicity and reliability.
Unlike other tools, it doesn’t require additional storage for your site files. Everything happens in real-time through cloud and it does not store your website data on their server. During website migration, all temporary files are deleted automatically.
I recently migrated all my websites to new hosting with the help of Migrate Guru and it worked like a charm. This is the first time that I migrated my websites on my own.
Why choose Migrate Guru?
- It works without requiring manual uploads.
- It ensures zero downtime during the move.
- Compatible with major hosting providers.
- It’s designed specifically for WordPress site migration.
- It’s free, easy to use, and handles even large websites (up to 200 GB) effortlessly.
Migrate Guru plugin is a lifesaver for anyone migrating a WordPress site.
Steps to Migrate a WordPress Site Manually With Migration Guru Plugin
Let’s walk through the process of migrating your site using Migrate Guru.
Step-1: Create a Blank Destination WordPress Site on a New Server
Before migrating your WordPress using Migrate Guru, you need to set up a blank destination site on your new server.
WordPress Installation: First, log in to your new host’s control panel and install WordPress. Look for options like “One-Click WordPress Install” or “Add New WordPress Site.” This tool does all the heavy lifting for you, no technical skills are required.
With your blank WordPress site ready, you’ve completed the foundation step. Now, it’s time to move your WordPress site files and database into this new home!
Step-2: Create FTP Port on New WordPress Site
The next step is to create an FTP (File transfer protocol) port on your new site. FTP is a tool for transferring files between the source and destination servers.
Most hosting providers already have FTP access enabled. Look for a section labeled “FTP Accounts” or “File Manager.” Here, you’ll find your FTP settings.
If you haven’t set up an FTP account yet, you may need to create one. Simply click “Add FTP Account,” fill in the details, and you’re good to go.
Step-3: Install the Migrate Guru Plugin on the Existing Website
Now, log in to your old site’s WordPress dashboard. Once inside, head to the “Plugins” section on the left-hand menu. Click on “Add New” to install Migrate Guru WordPress plugin to your existing site.
Once the plugin is active, you’re ready to move on to the next step: filling out the migration form to start the actual transfer.
Step-4: Fill out the Website Migration Details
Now, it’s time to fill out the migration details in this last step. This step connects your old WordPress site to a new host server and starts the transfer process. Don’t worry—it’s straightforward, and Migrate Guru walks you through it step by step.
Here’s what to do:
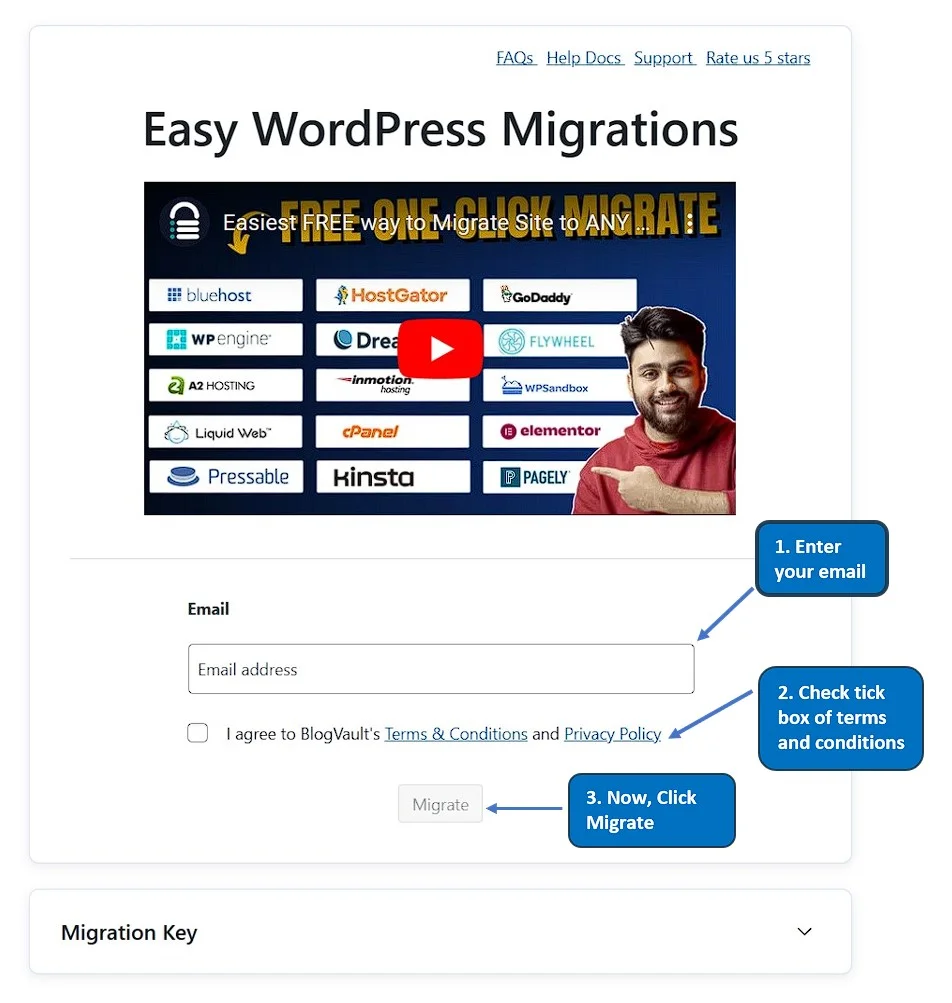
1. Open Migrate Guru Plugin: Open the Migrate Guru plugin and enter your email address, tick the terms and conditions box, and press the Migrate button. We don’t need the migration key in this process.
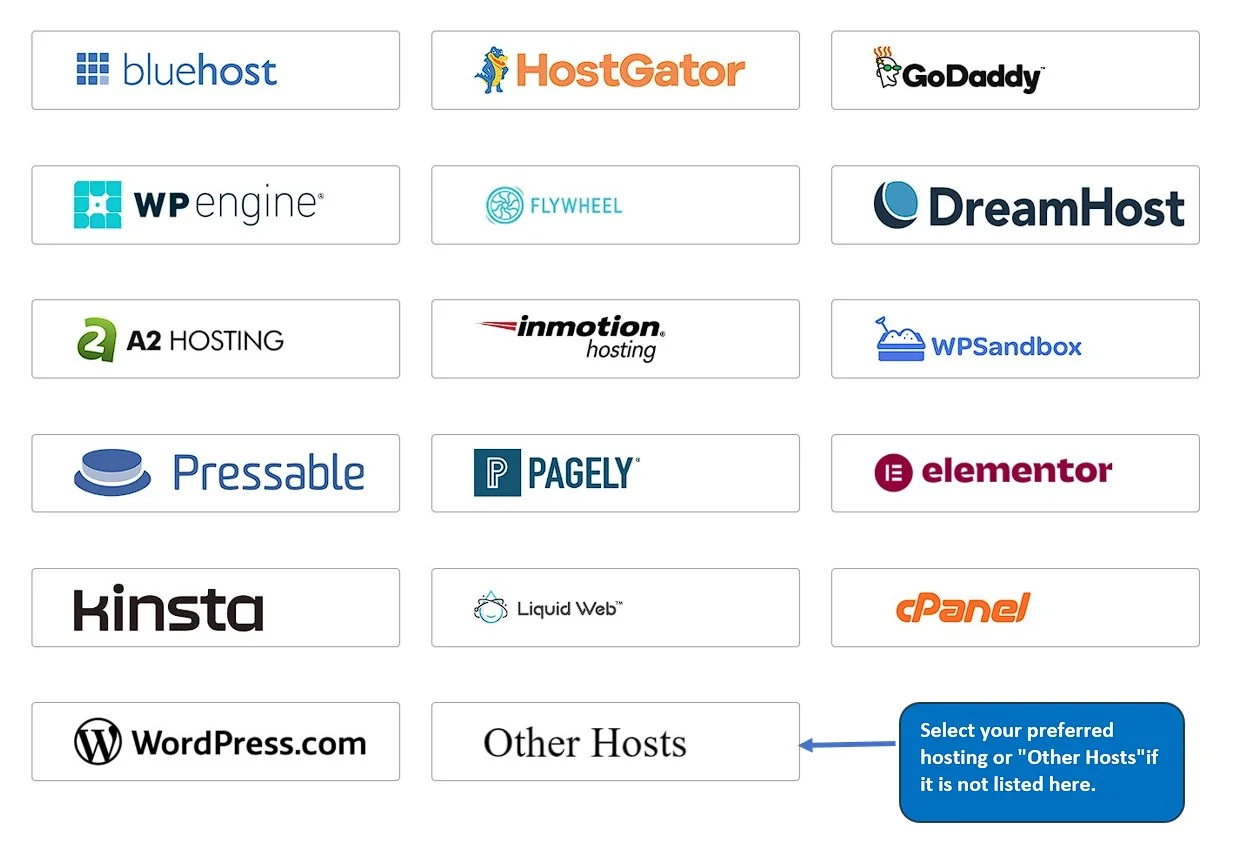
2. Choose Your Host: Migrate Guru supports many hosting providers, so the first thing it will ask is to select your new host from the list. If your host isn’t listed, just select the “Other Hosts” option instead.
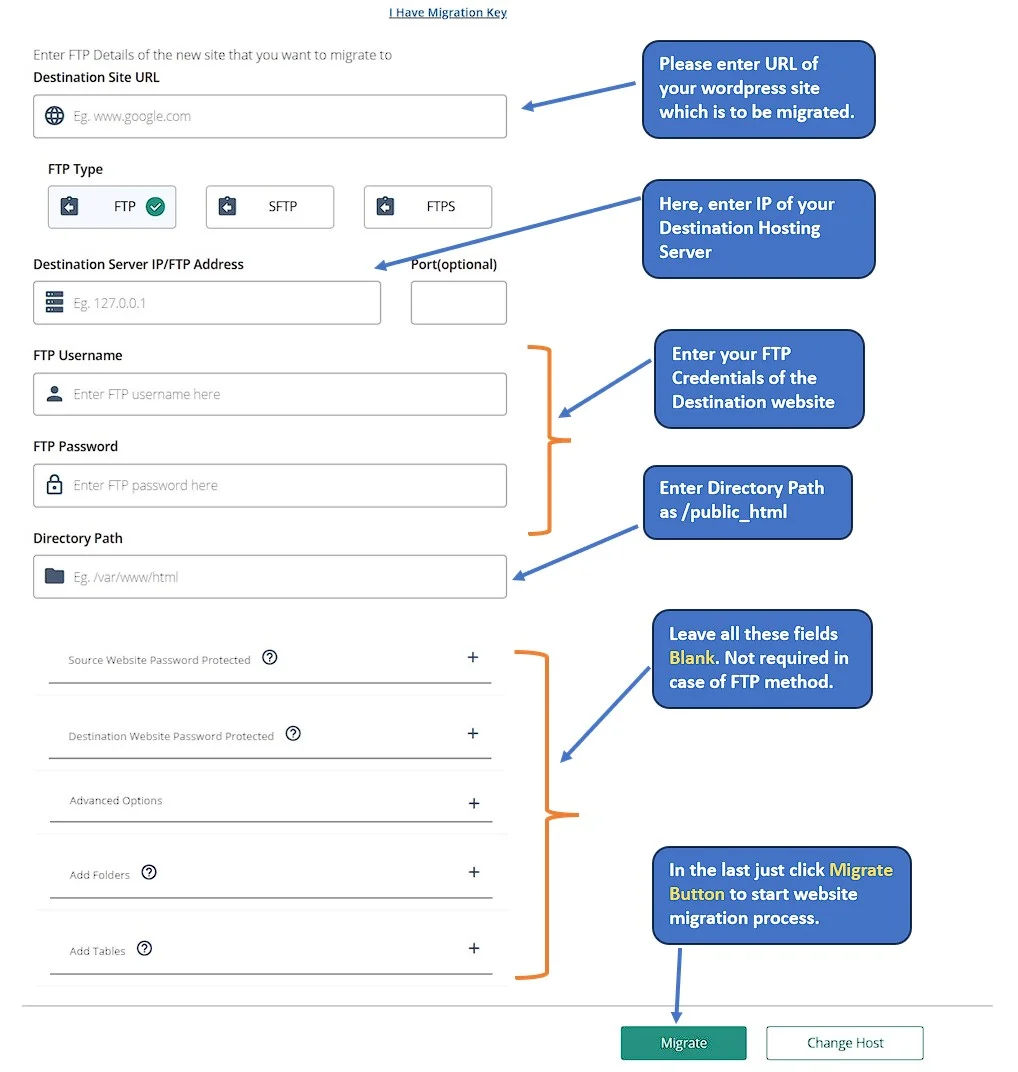
3. Enter Your New Host Details: In this next screen, click the “Manually Input Host Details” button and fill up the mandatory fields.
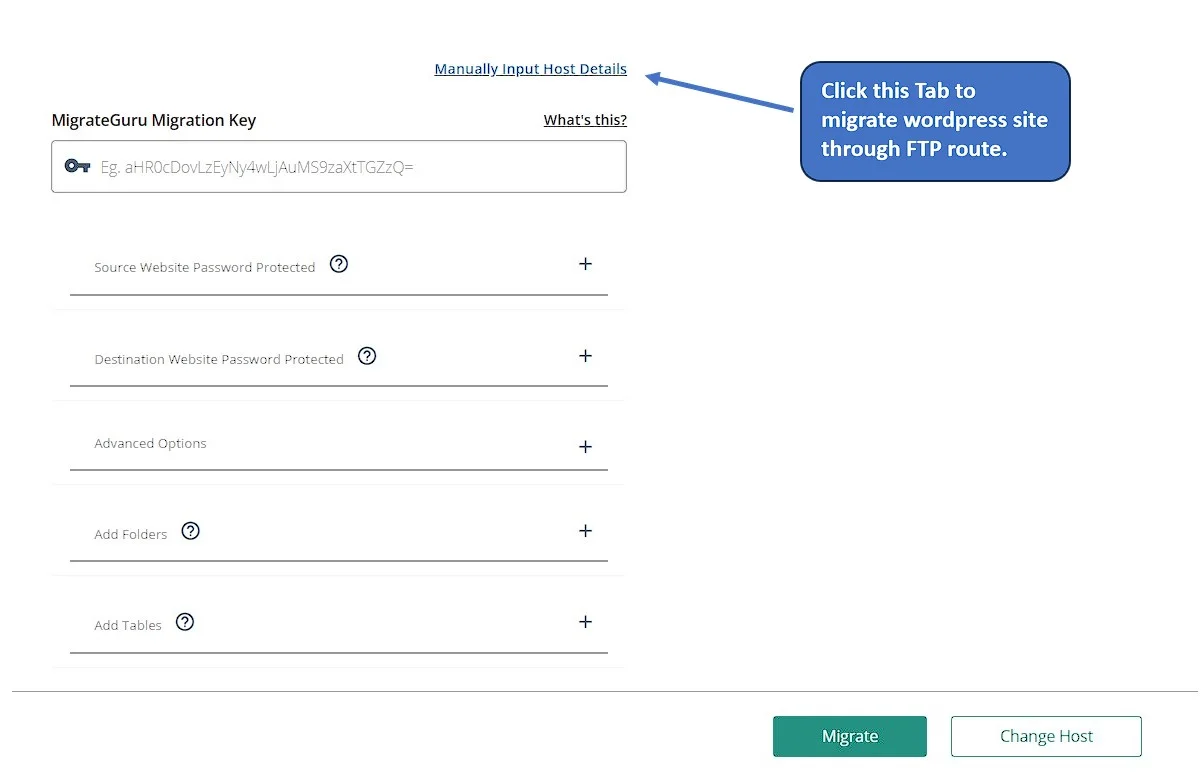
Destination Site URL: This is very important. If SSL is installed on your site, then enter your website URL as https://yourwebsite.com wherein yourwebsite.com is the name of the site to be migrated, and in case of non-SSL sites, enter your site URL as www.yourwebsite.com or http://yourwebsite.com
FTP: FTP will be selected by default. Don’t change it.
Destination Server IP/FTP Address: Here, enter the IP Address of your new Hosting Server. Leave Port blank, not required.
FTP Credentials: Enter your FTP Username and password to access your new hosting server.
Destination Folder: This is where the plugin will place your migrated files. Usually, it’s something like /public_html.
Start the Migration: Once you enter all the details, double-check them to ensure they’re correct. When you’re ready, hit the Migrate button. The plugin will now take over and begin transferring your site.
What’s great about Migrate Guru is that it automates the heavy lifting. It moves your WordPress files and database to the new server without you having to manually upload or configure anything.
During the migration process, you’ll see a progress bar. Depending on your site size, this might take a few minutes. Grab a coffee, and let the plugin do its magic! Once it’s done, you’ll receive an email confirmation that your migration was successful.
Post-Migration Steps
Congratulations! Your WordPress site has been successfully migrated to the new server. But hold on, we’re not done yet!
After the migration, there are a few important tasks to ensure everything is working smoothly. Think of this step as unpacking and setting up your new home.
Verifying the Migration Success
The first thing you should do is check if your new site is working as expected. Open your web browser and visit your website’s new URL.
Does everything look right? Click through your pages, check your posts, and test your menus. Make sure all images are loading, and links are working.
Checking the SSL Certificate
If your site on the old host used SSL, ensure it’s working on your new site. Most hosts provide a free SSL certificate.
In my case, I gave the website URL as www.yourblogjourney.com during the migration process, whereas my site had an SSL Certificate. So, I installed the Search and Replace plugin and replaced http://www.yourblogjourney.com with https://yourblogjourney.com. But before doing this, I first backed up my site. So, use this cautiously after taking a backup of your site.
Updating Links and Configurations in WordPress
During the migration, some internal links might still point to your old site. Use the same search and replace plugin to find and update these links to match your new domain name.
Also, head to the WordPress dashboard and check your settings under “General.” Ensure the “Site Address (URL)” and “WordPress Address (URL)” match your new site’s domain name.
If your site uses contact forms or other interactive features, test them to make sure they’re working properly. Some plugins may need to be reconfigured after the migration. Visit the “Plugins” section in your dashboard and confirm that all plugins are active and functional.
Now’s a good time to check your site’s speed and performance on the new host. Use tools like Google Page Speed Insights or GTmetrix to see how your site is performing. If it’s slower than expected, contact your hosting provider for assistance or reconfigure your cache plugins, such as WP Rocket or LiteSpeed.
Wrapping Up
Migrating a WordPress site might seem daunting, but with the right tools and preparation, it’s a straightforward process. Whether you’re using Migrate Guru or doing it manually, the key is to stay organized.
Follow the steps mentioned int this article, and your site will be up and running on the new server in no time.
After migration, you will have to fine-tune your website to increase its speed. For this, you can read our article on Best Plugin to Increase Website Speed
FAQ – WordPress Migration
Ans: It’s the process of moving a WordPress site from one host to another, including files and the database.
Ans: Using a plugin like Migrate Guru is the easiest way to migrate.
Ans: Export your files and database, then import them to the new server using a migration tool or manually.
Ans: Use plugins like All-in-One WP Migration or Migrate Guru to export and import your site’s content.
Ans: Many plugins offer free options. Professional services can range from $50 to $200, depending on the site size.


